Helium polish software
Detailed description of updates and possibilities
for new pre-release (3.50.773) of program Helium Polish
  1. Image of parameters in the scene
  2. Automatic diagnostics of diamond shift during scanning process
  3. Automatic diagnostics of hit of the vertex of Table facet of scanned diamond to the holder hole
  4. Reports for semipolished diamonds and for arbitrary cuts
  5. Improved reports for RBC, Marquise, Pear, Oval cuts, which are considered the specificity of these cuts
  6. Greatly better building of fancy cuts such as Marquise, Pear, Oval
  7. Time of scanning is decreased significantly
  8. Modes of scanning were changed and improved

1. Image of parameters in the scene

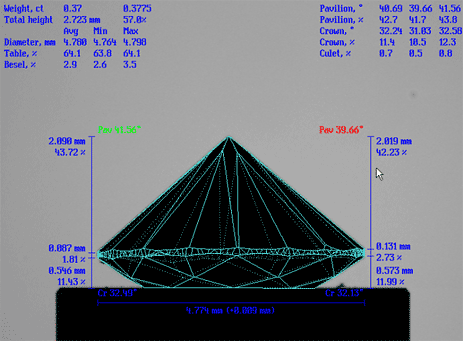
After scanning and building of model you can see information about model in the scene. For switching on of this tool please click by the button of mouse on the "Info" in the toolbar of panel Scan polished diamond.

Figure 1

Information consists of sections with parameters of three-dimensional model of stone (at the top right and left corners) and section with parameters of two-dimensional current projection which you see in present moment in the Scene.

In case of movement or rotation of model information of 2D-projection is ever-changed. It corresponds to projection in the scene plane. When you rotate model in arbitrary position then program shows information about facets whose azimuths of normals is more closed to scene plane.

Information includes next values of parameters (see figure 2):

  • At the bottom you can see current diameter and difference between current and minimal values of diameter in parentheses.
  • Upper there is information about stone crown: angles and heights (in mm and in %) opposite facets (in case of main facets you can see “Cr” near values, in case of upper facets you can see “Up”) whose normals (exactly azimuths of normals) are the most closed to scene plane.
  • Upper there is information about stone pavilion: angles and depths.

Note that minimal value of parameter is shown in red color, maximal value of parameter in green color (see figure 2).

Section with total information of 3D model is at the top of Scene. There are weight of stone, total height in mm and %, minimal, average and maximal values for diameter, table, bezel girdle thickness, pavilion angle and depth, crown angle and height, culet size.

Figure 2

2. Automatic diagnostics of diamond shift during scanning process

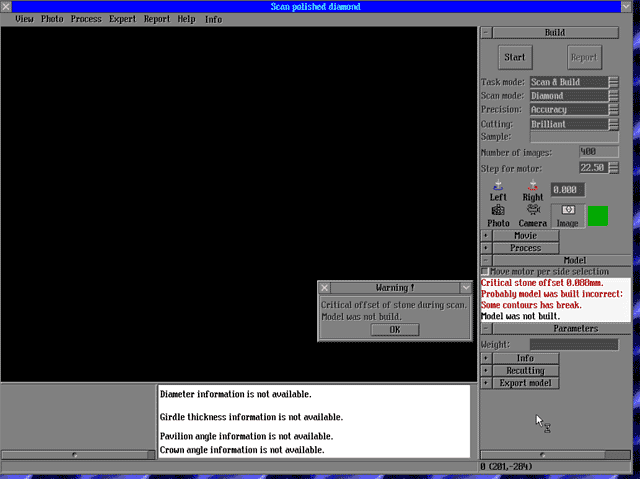
During scanning process stone can be shifted from its primary position because of rotation of motor. In this case program automatically determines shift and after scanning process you will see message "Critical offset of stone during scan" (see figure 3). Program doesn't build model if stone is shifted. Press ok. You will see red message in the Scene "Critical stone offset is ….mm" until rescanning. Please check work of pump and scan stone once again.

Figure 3

3. Automatic diagnostics of hit of the vertex of Table facet of scanned diamond to the holder hole

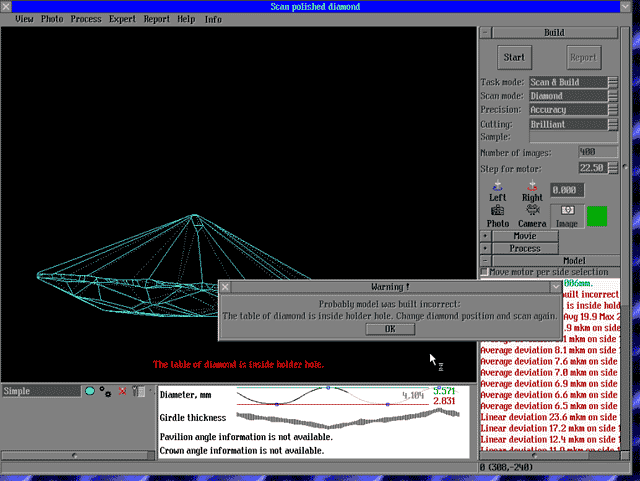
During scanning one or some vertexes of stone table may be situated in the holder hole. Program defines this mistake and after scanning and building of model message will be appeared: "Probably model was built incorrect: The table of diamond is inside holder hole. Change diamond position and scan again". (See figure 4). Please follow these instructions and don’t use wrong model in future.

Figure 4

4. Reports for semipolished diamonds and for arbitrary cuts

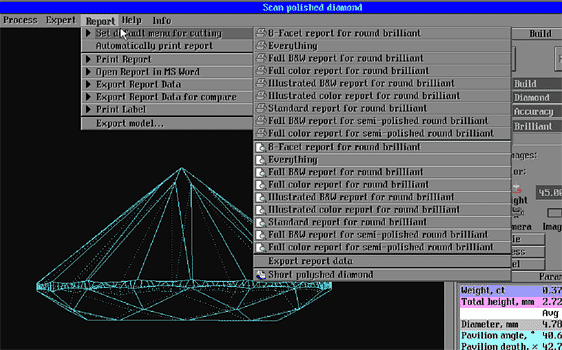
Menu Report was changes in new version. Thus it consists of reports for semipolished diamonds and improved reports for fancy cuts (see figure 5).

Menu Report includes some submenus:

  • "Set default menu for cutting" - you can choose default action which will be realized after you push button "Report" (near button "Scan" in right block of panel "Scan polished diamond") - you can choose operation of printing or opening of any type of report. Last button is for printing of labels (Label Printer device is necessary).
  • "Automatically print report" – if you mark this action then after scanning and building of model program automatically will execute default operation (see above).
  • "Print Report" and next menu "Open Report". You can print and open in MS Word any type of report. If you work with semipolished diamond then choose action "Full color report for semi-polished brilliant" or "Full B&W report for semi-polished brilliant". If you work with rounded fancy cuts (Marquise, Oval or Pear) then choose "…report for rounded fancies". If you work with rectangular cuts then choose "…for rectangular fancies". Please don’t forget necessary cutting in right block of panel "Scan polished diamond" before scanning.
  • "Export report Data" is necessary for export data in application which was choosed by user.
  • "Export report Data for compare" is necessary for test and check of repeatability of results.
  • "Print Label". You can print label if you have installed device "Dymo Label Printer" on your computer.
  • "Export model…". You can save existing model in files with extensions *.osf and *.dmc and import it in different applications.

Figure 5

5. Improved reports for RBC, Marquise, Pear, Oval cuts, which are considered the specificity of these cuts

New templates of reports are accessible for Helium System users.

Besides new design of reports the following parameters were added:

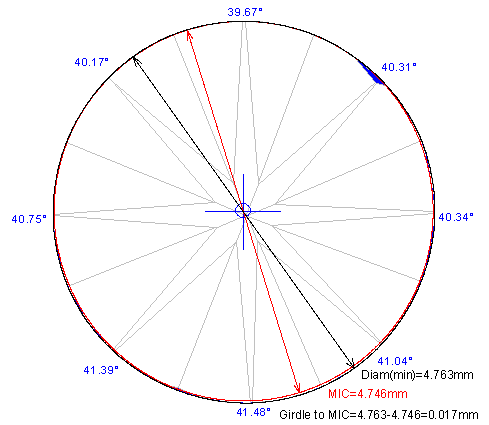
  • Parameter "Girdle to MIC" is value of difference between minimal diameter and diameter of inscribed in girdle circle. Also this parameter is shown in string "Measurements" after values of diameters after symbol "/" (it is available for RBC reports only).

    Figure 6

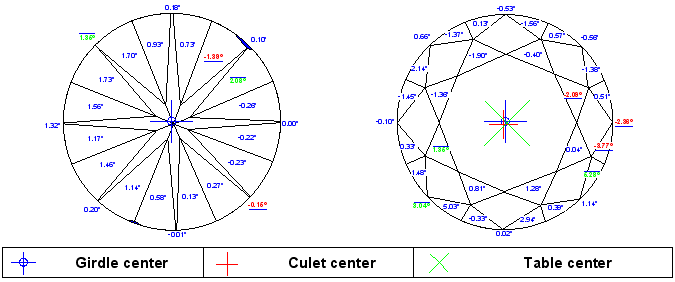
  • Parameters "Girdle-Table offset (by table axis)", "Girdle-Culet offset (by table axis)", "Table-Culet offset (by table axis)" are values in mm and % from average diameter with possible error. Program measures offsets as distance between normals from centers of table (or girdle or culet) by table. For example, "Girdle-Table offset (by table axis)" is distance between normal lying from girdle center (exactly mass center of girdle) by table and table center (it is available for RBC reports and round fantasy reports).

  • For visualization of described above parameters illustrations of crown view and pavilion view have images of table center, girdle center and table center. Diameter of circle on image "Girdle center" is equal 2% from average stone diameter to visual estimation of symmetry and distance between table, girdle and culet centers (it is available for RBC reports and round fantasy reports).

    Figure 7

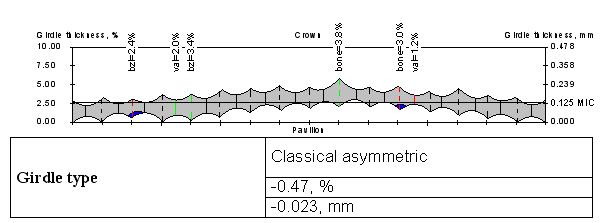
  • The new parameter "Girdle Type" is available. The digital value of this parameter is a distance between average value of Girdle Thickness: Bezel and average value of Girdle Thickness: Bone. The text description depends on digital value and may be Classical, Classical asymmetrical, Digging (Gouging) or Thinning (Gouged) (it is available for the reports for polished brilliant only).

    Figure 8

  • Illustration reports have new structure and additional illustrations of crown view and pavilion view with values of slope angles see Illustration reports for Polished Brilliant and Polished Fancy.
  • Parameters "Azimuths deviation from ideal" are values of deviation in degrees between azimuths of real facets and azimuths of virtual facets of ideal round brilliant cut. Ideal azimuths of facets are 0.000, 45.000, 90.000, 135.000, 180.000, 225.000, 270.000, 315.000, and 360.000 (it is available for the reports for polished brilliant only).

    Figure 9

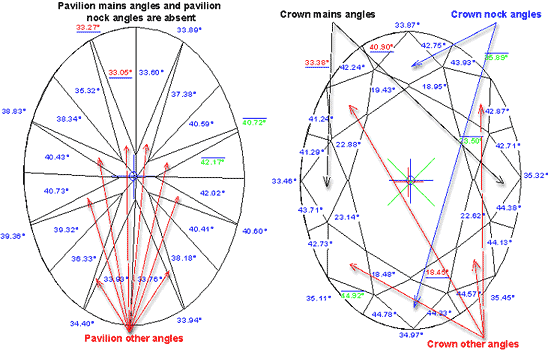
  • Parameters "Crown mains angles", "Crown nock angles", "Crown other angles" and the same parameters for Pavilion are added for the reports for round fantasy cuts (marquise, oval and pear). Mains angles are slope angles of facets in place of minimal diameter, nock angles are slope angles of facets in place of maximal diameter. Other angles are slope angles in other places.

    Figure 10

    Also new reports for rectangular fantasy cuts and semipolished stones are available. These reports were improved, many parameters were added. Now reports contain heights and angles of each facet.

6. Greatly better building of fancy cuts such as Marquise, Pear, Oval

7. Time of scanning is decreased significantly

The overall improvement (scanning and building of model) in the speed is about 25%.

Method (precision) Quantity of contours Time of scan mode, sec Time of build mode, sec* Total time, sec
Quick 100 9 4 13
Optimum 200 17 7 24
Accuracy 400 34 11 45
Hi accuracy 800 68 19 87
* Time of work is measured with help of diamonds: symmetrical RBC 0.55 ct, asymmetrical RBC 0.37 ct (Quick and Accuracy) and Marquise 0.32 ct (Hi accuracy). Time of build mode depends on quantity of dust on the stone surface and mass and cutting form of stones, it can change from time to time within the limits of 5 sec.
Computer: CPU 3.0 GHz (Hyperthreading), RAM 512 Mb.

8. Modes of scanning were changed and improved

Method "Optimum" was changed and now it takes about 23 sec and at the same time accuracy of this method only 1,5 times less than "Accuracy" mode which takes about 45 sec. Now program has following existing methods:

  • Quick - method for express diagnostic of average values of stone. Program uses 100 photos.
  • Optimum - optimal method for estimation of large array of stones for a short time. Program uses 200 photos.
  • Accuracy - best method for estimation of parameters of separate facets. Recommended method for using and grading of separate RBC diamonds. Program uses 400 photos.
  • Hi Accuracy - method for fantasy stones. Program uses 800 photos.
  • Test - method for tuning and calibration of system. Method is used only by dealers of OctoNus Company.

Versions history
Helium news